
1. Overview
The Radianse solution consists of two kiosk interfaces:
Admin Kiosk (Employee Facing): https://radianse.io
Member Kiosk (Member Facing): https://schedulekiosk.radianse.io
Initial Setup Procedure
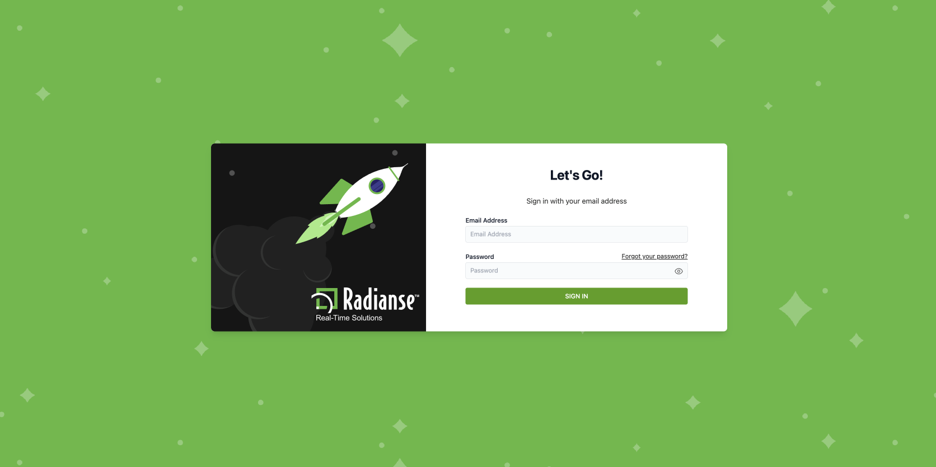
Navigate to https://radianse.io and sign in with your email address and password. If you do not have an account yet, contact Radianse — you will be sent an email invitation with a link to complete your account setup.
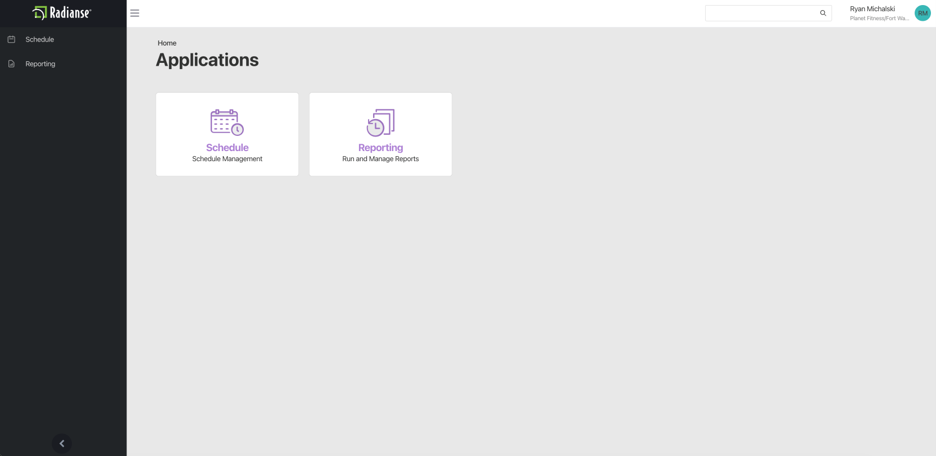
Once logged in, the dashboard will display all available modules. The options shown may vary depending on your access level. All modules are also accessible at any time from the navigation panel on the left side of the screen. The two primary modules are Schedule and Reporting.
- Member Kiosk — A touch screen device facing club members, used for self-service scheduling and check-in.
- Admin Kiosk — Faces staff and runs the Radianse Local Service. Used for managing schedules, reports, and equipment.
Admin Kiosk (Employee Facing): https://radianse.io
Member Kiosk (Member Facing): https://schedulekiosk.radianse.io
Initial Setup Procedure
- Create your account using the invitation email sent to you by Radianse. If you have not received an invitation, contact Radianse support.
- Log in to the Admin Kiosk at https://radianse.io using your account credentials.
- Select your club from the tenant dropdown menu. This option is available to Managers, Owners, and Technicians.
- Navigate to the Member Kiosk at https://schedulekiosk.radianse.io on the member-facing device.
- Authorize the device using the token displayed on screen. You may be prompted to log in again, which is expected behavior.
- Verify the Member Kiosk displays the correct club page. Connect a barcode scanner to the device if one will be used.
Navigate to https://radianse.io and sign in with your email address and password. If you do not have an account yet, contact Radianse — you will be sent an email invitation with a link to complete your account setup.
Once logged in, the dashboard will display all available modules. The options shown may vary depending on your access level. All modules are also accessible at any time from the navigation panel on the left side of the screen. The two primary modules are Schedule and Reporting.
2. Starting an Amenity
Once a member has scheduled an amenity from the Member Kiosk, staff can start the session from the Admin Kiosk. The Schedule screen displays all upcoming reservations in chronological order, with each entry showing the member's profile photo, name, amenity type, and time slot. The next upcoming session is displayed in bold.
Note: If the schedule appears empty, this simply means no sessions have been booked yet. The list will populate as members schedule amenities.
Starting a Session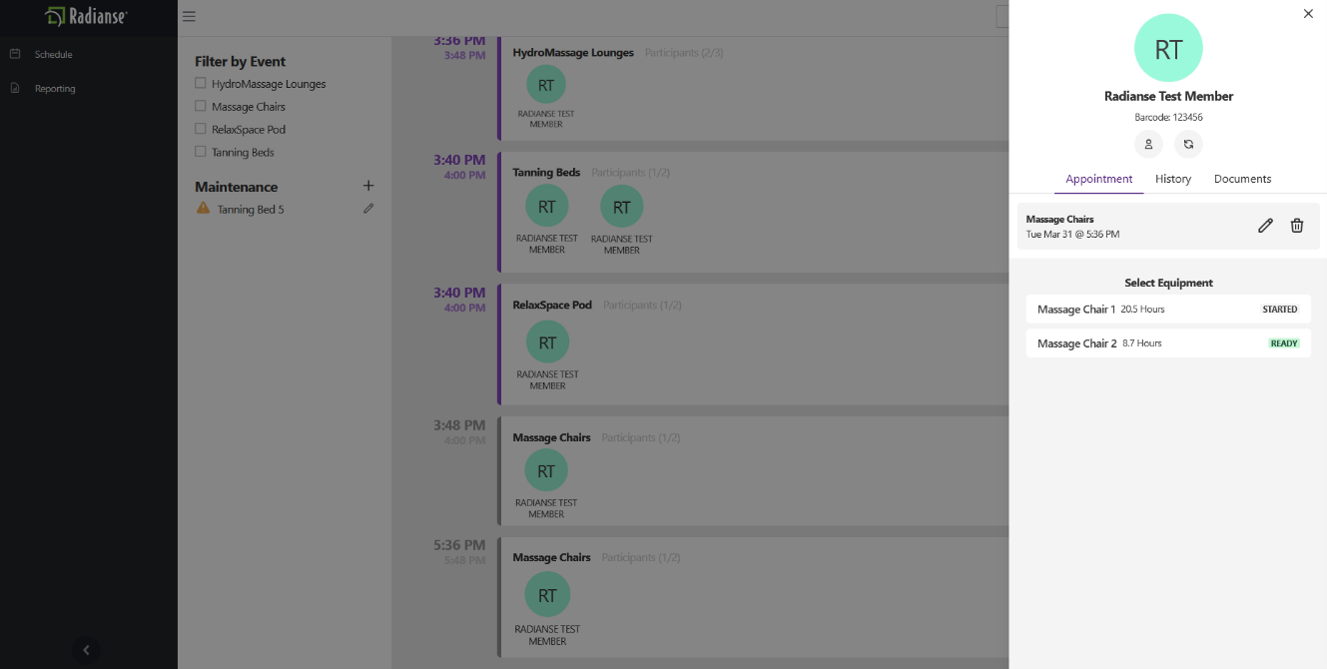
Tip: You can stop the delay at any time without affecting the member's schedule. This is useful if you need to make a correction before the session begins.
Operator Code Requirement
Some clubs require staff to validate their identity before starting an amenity. If your club has this setting enabled, you will see a "Failed Requirements" message when attempting to start a session.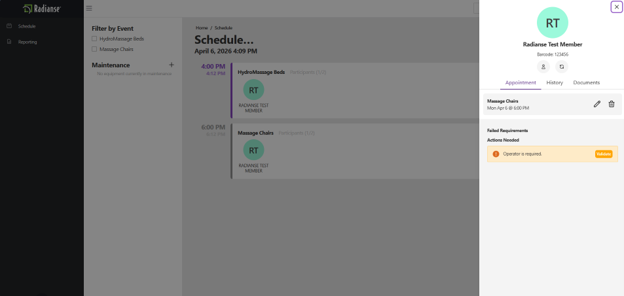
Note: If the schedule appears empty, this simply means no sessions have been booked yet. The list will populate as members schedule amenities.
Starting a Session
- Click the member's profile photo on the Schedule screen. A panel will open on the right side of the screen showing the member's details.
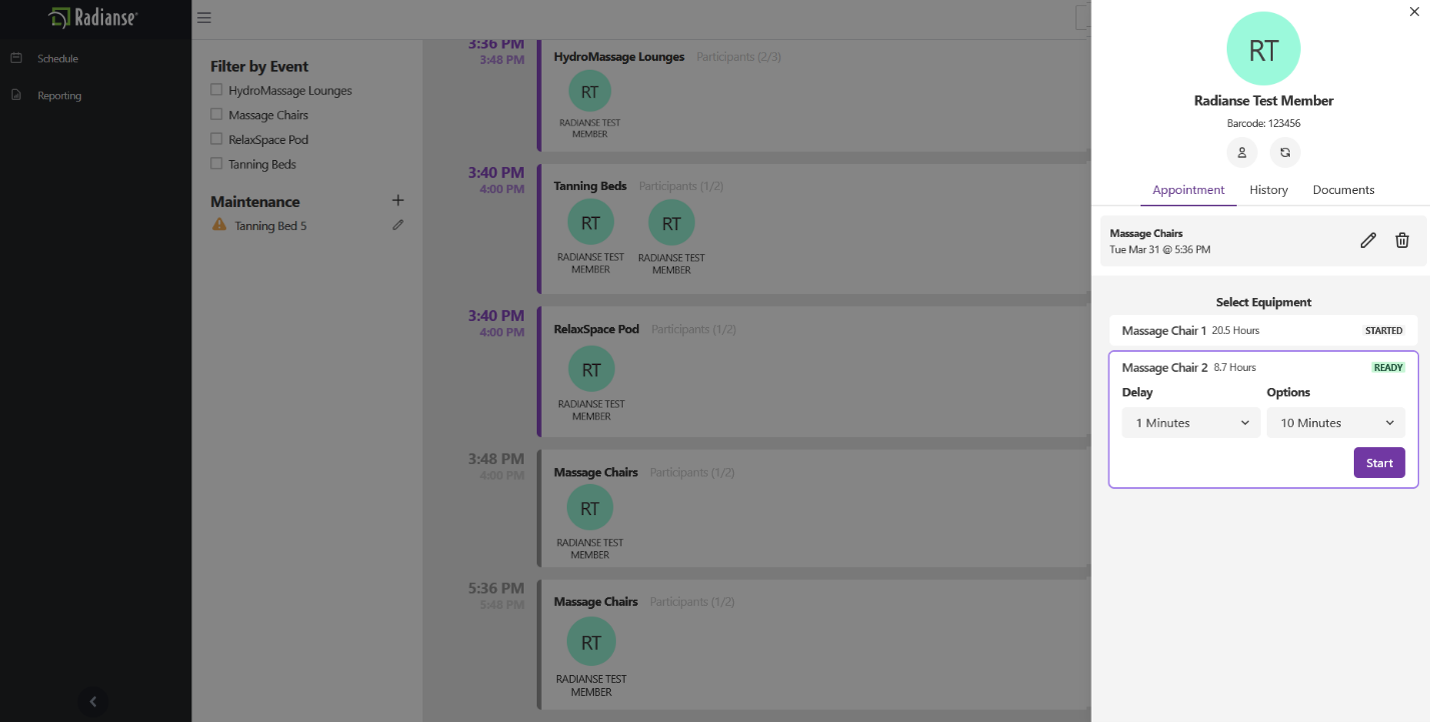
- In the Select Equipment section, choose the specific unit to assign to this member (e.g., Massage Chair 1 or Massage Chair 2). Each piece of equipment displays a cumulative usage total (e.g., "0.1 hours"), which helps staff track bulb hours and determine when maintenance is needed.
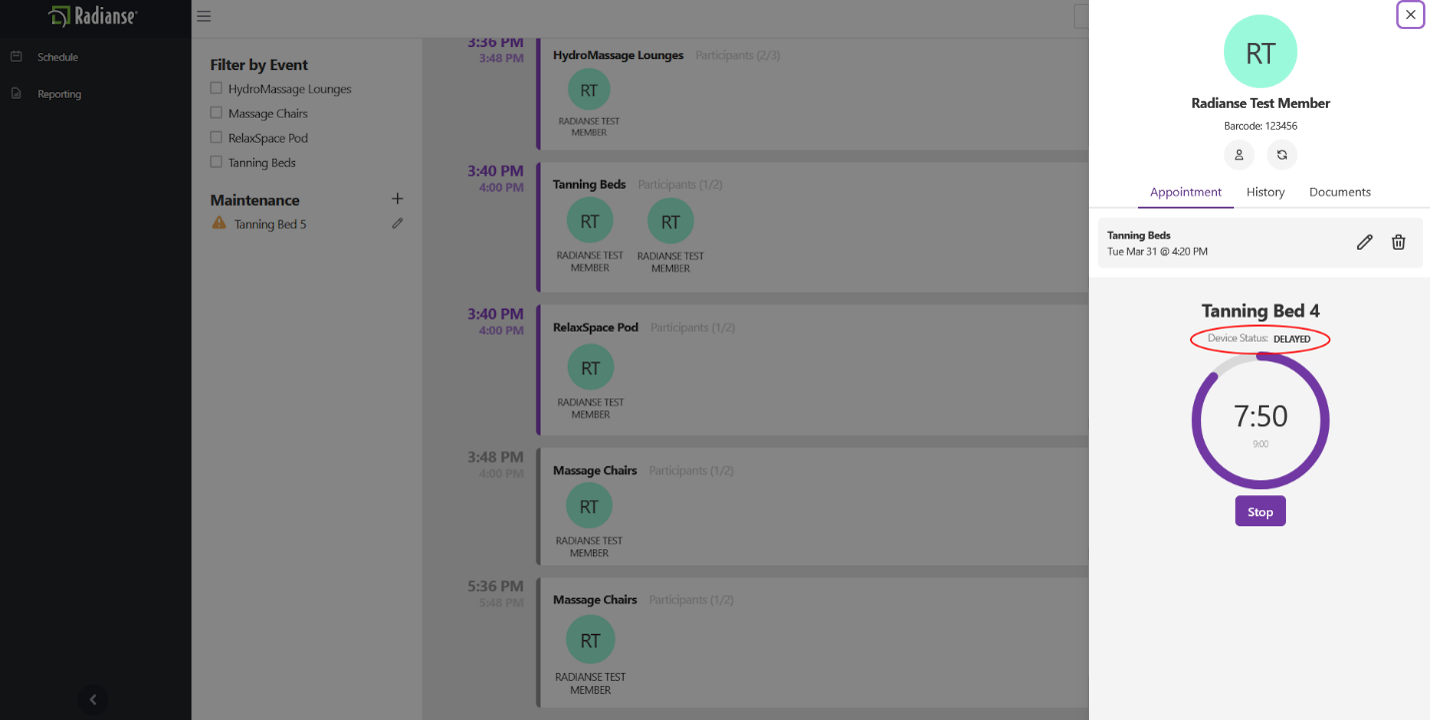
- Set the Delay and Duration values using the dropdowns, then click Start.
- Once started, the delay countdown will begin. When the delay expires, the amenity session will start automatically. If no delay was set, the session begins immediately.
Tip: You can stop the delay at any time without affecting the member's schedule. This is useful if you need to make a correction before the session begins.
Operator Code Requirement
Some clubs require staff to validate their identity before starting an amenity. If your club has this setting enabled, you will see a "Failed Requirements" message when attempting to start a session.
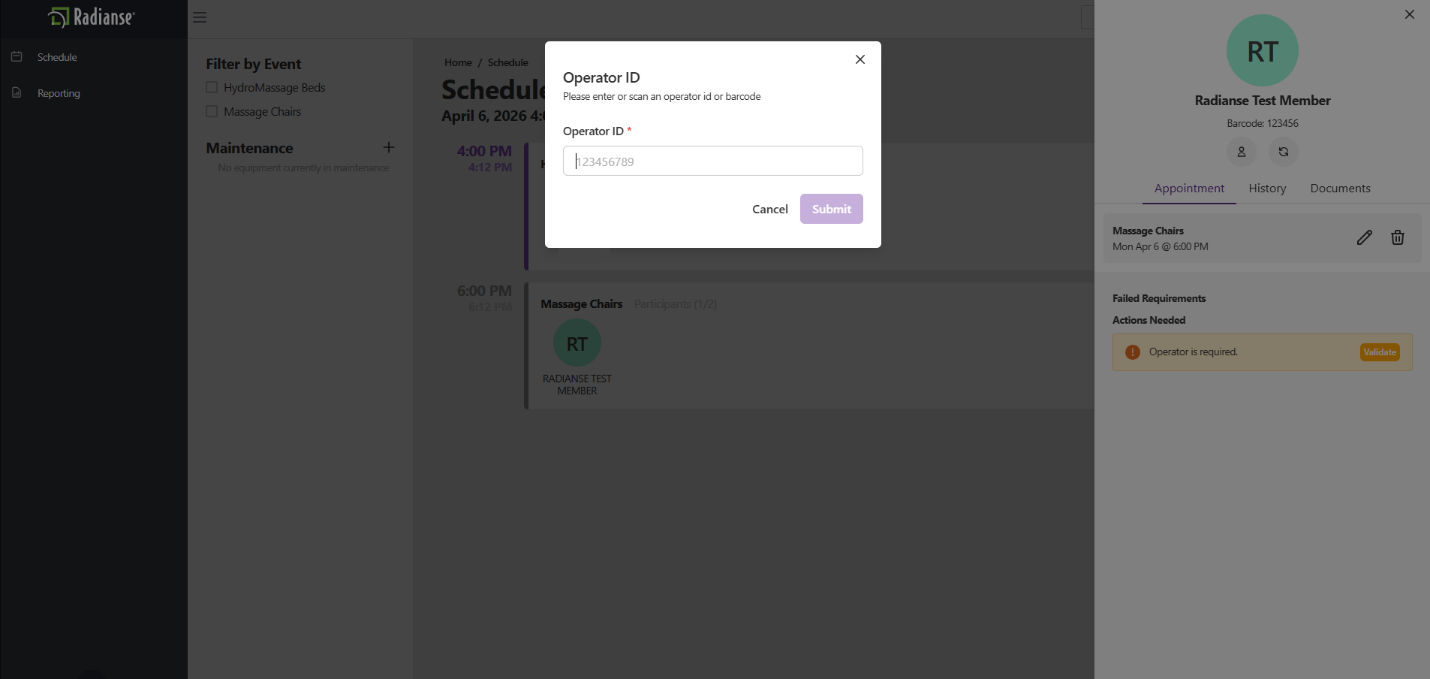
- Click the Validate button to open the Operator ID prompt.
- Enter your employee Black Card Amenity Barcode as the Operator ID (you can type it manually or scan it), then click Submit.
3. Manual Scheduling
While members can book their own sessions from the Member Kiosk, staff can also create reservations directly from the Admin Kiosk. This section covers the full manual scheduling process, including handling unrecognized members and requirement errors.
Creating a Reservation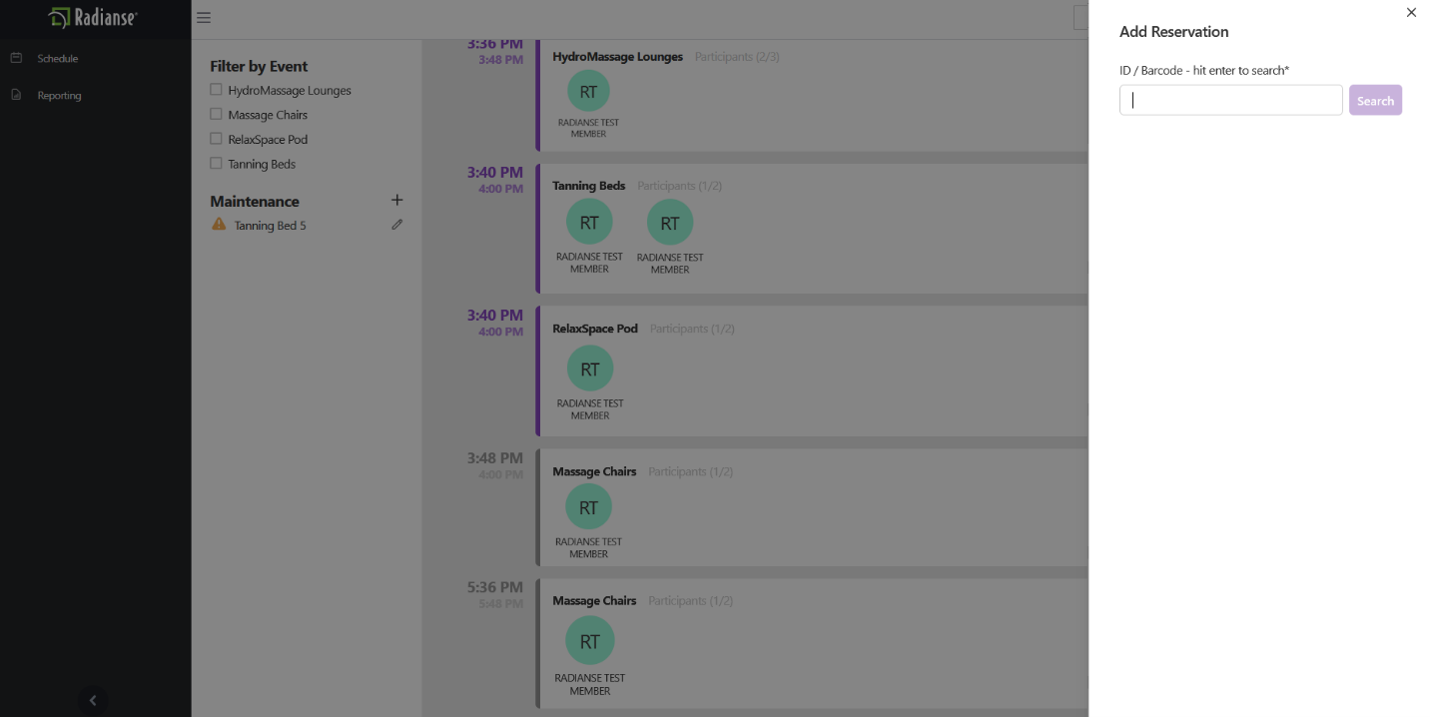
Barcode Not Found
If a member's barcode is not recognized after searching, an error message will be displayed. This typically means the member's home club has not yet been added to Radianse. To add the member manually: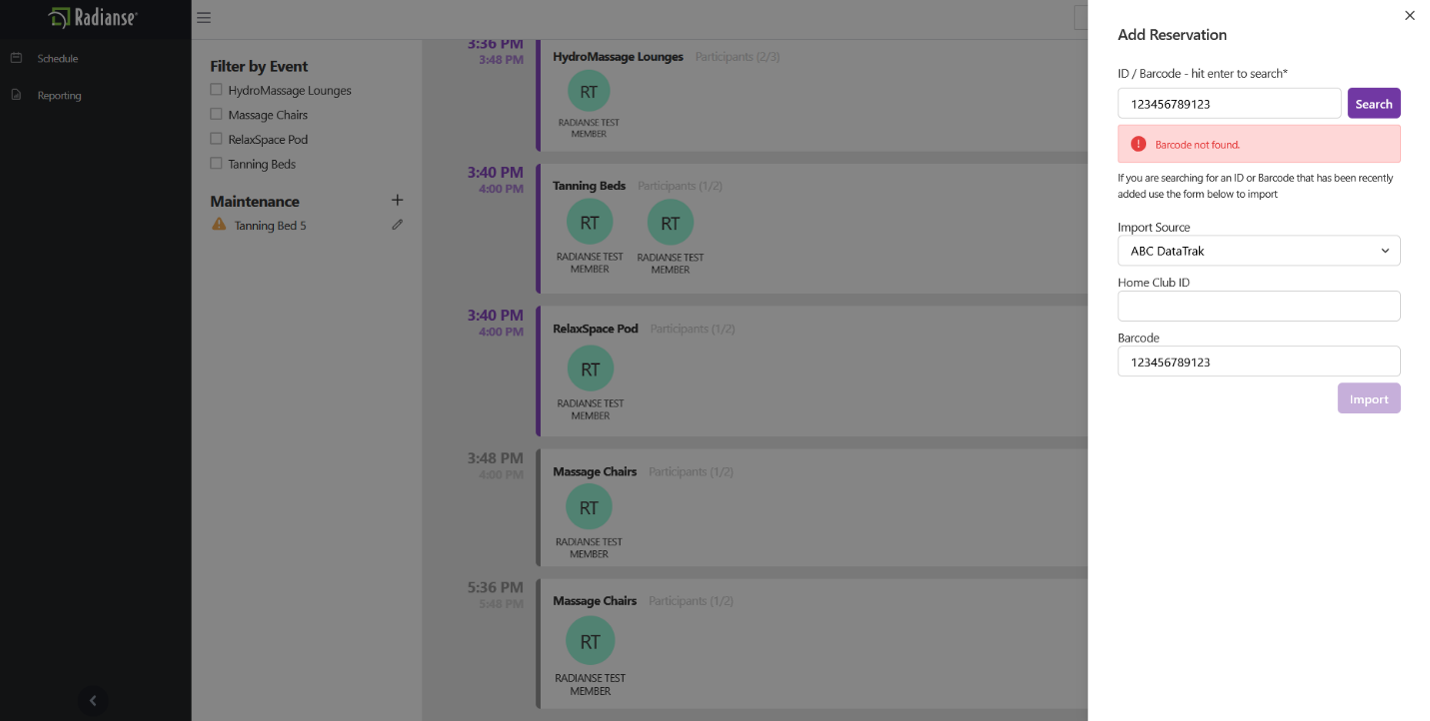
Requirements Not Met
Some amenities require that members have signed applicable waivers or hold a specific access level before they can be scheduled. If a member does not meet these requirements, a red error message will appear explaining what is missing.
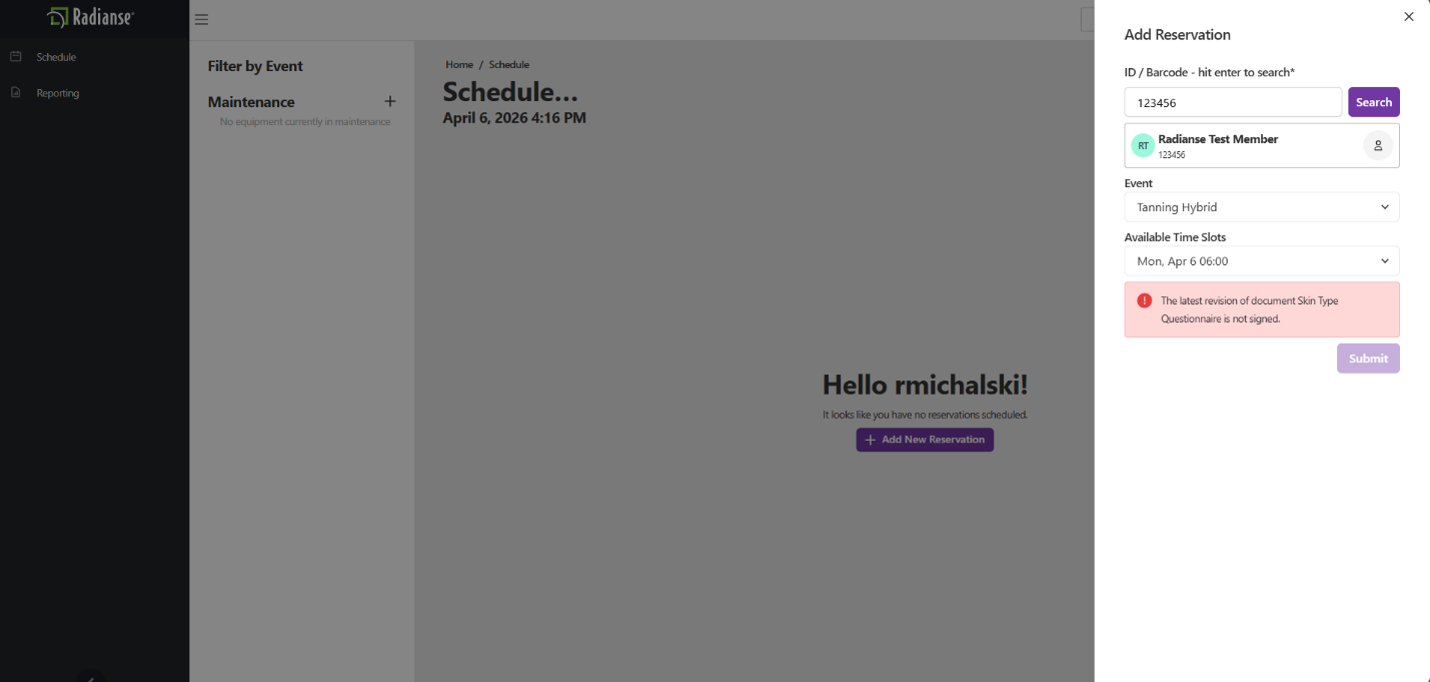
To resolve this, direct the member to the Member Kiosk and have them schedule the amenity themselves. This will prompt them to complete any required waivers or documents. Once completed, you will be able to proceed with scheduling or starting the session from the Admin Kiosk.
Creating a Reservation
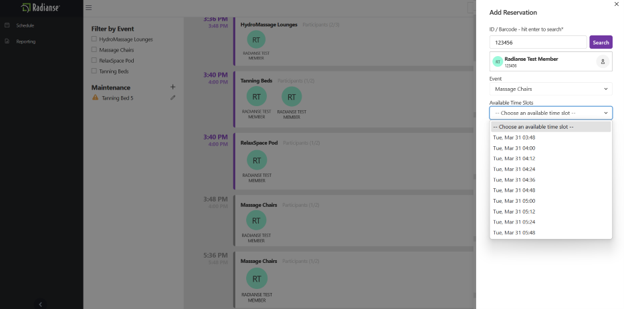
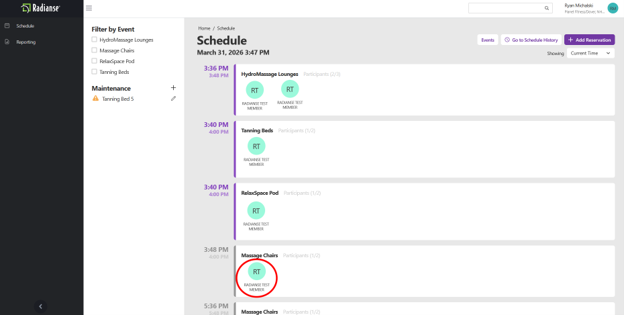
- From the Schedule screen, click the + Add Reservation button. This button appears both at the top right of the page and in the center of the screen when no reservations are present.
- An Add Reservation panel will appear on the right. Enter the member's barcode ID in the field provided, then click Search. You can type the barcode manually or use a scanner.
- If the barcode is recognized, the member's profile photo, name, and barcode will appear. Use the Event dropdown to select the amenity type.
- After selecting an amenity type, the Available Time Slots dropdown will appear. Select the desired time.
- Click Submit to add the reservation. It will immediately appear on the Schedule screen.
Barcode Not Found
If a member's barcode is not recognized after searching, an error message will be displayed. This typically means the member's home club has not yet been added to Radianse. To add the member manually:
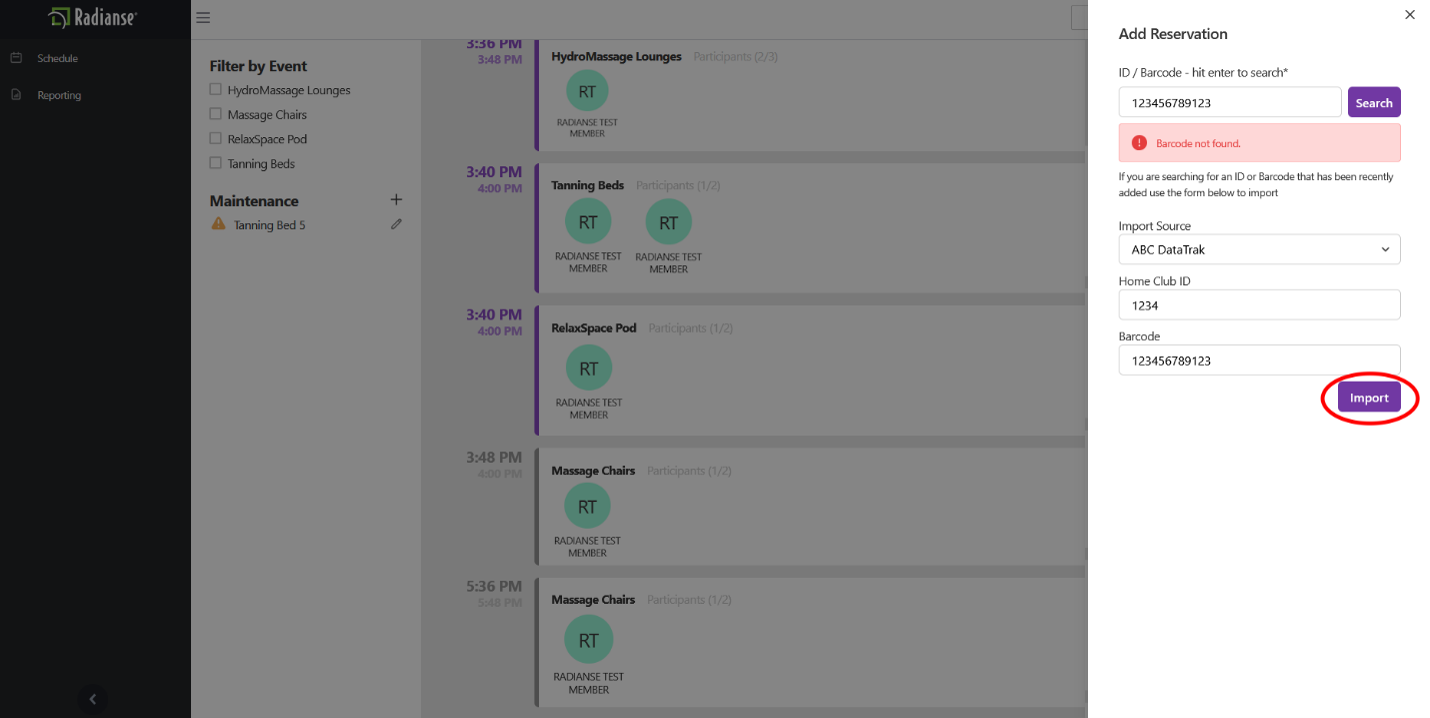
- Locate the member's home club ABC number.
- Enter it in the Home Club ID field.
- Click Import. The member's profile will be imported and the reservation process can continue.
Requirements Not Met
Some amenities require that members have signed applicable waivers or hold a specific access level before they can be scheduled. If a member does not meet these requirements, a red error message will appear explaining what is missing.
To resolve this, direct the member to the Member Kiosk and have them schedule the amenity themselves. This will prompt them to complete any required waivers or documents. Once completed, you will be able to proceed with scheduling or starting the session from the Admin Kiosk.
4. Edit a Schedule
Existing reservations can be rescheduled to a different time slot directly from the Schedule screen.
Rescheduling a Reservation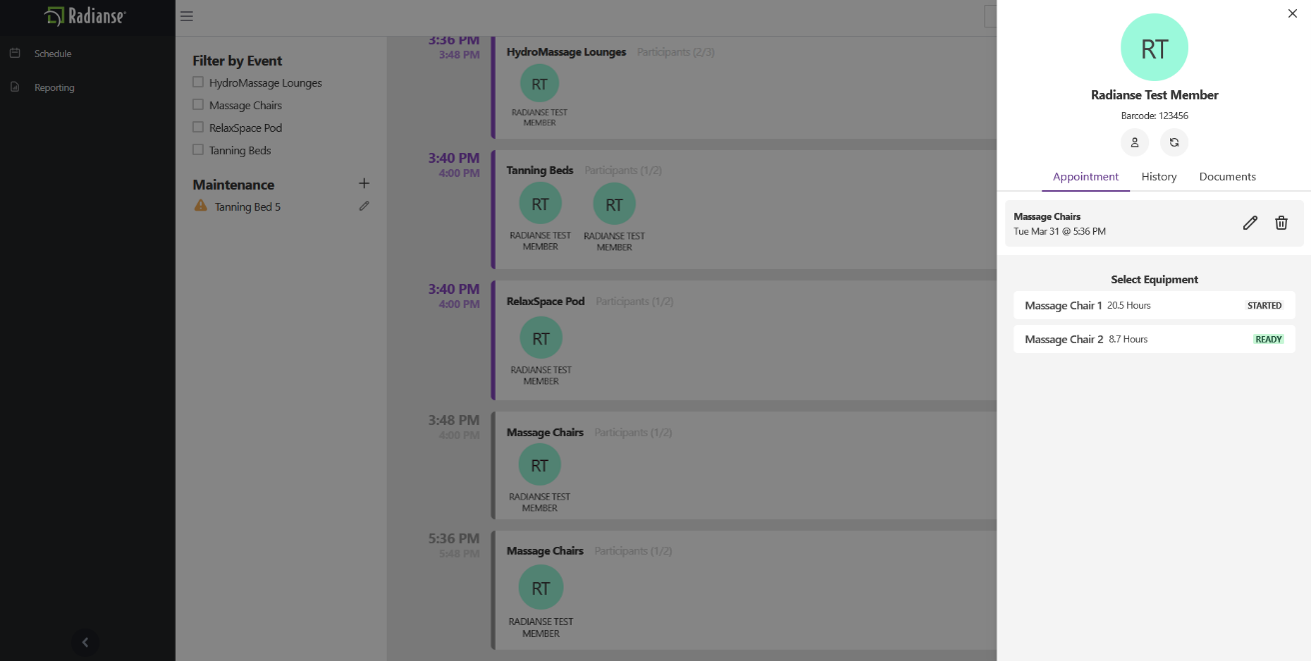
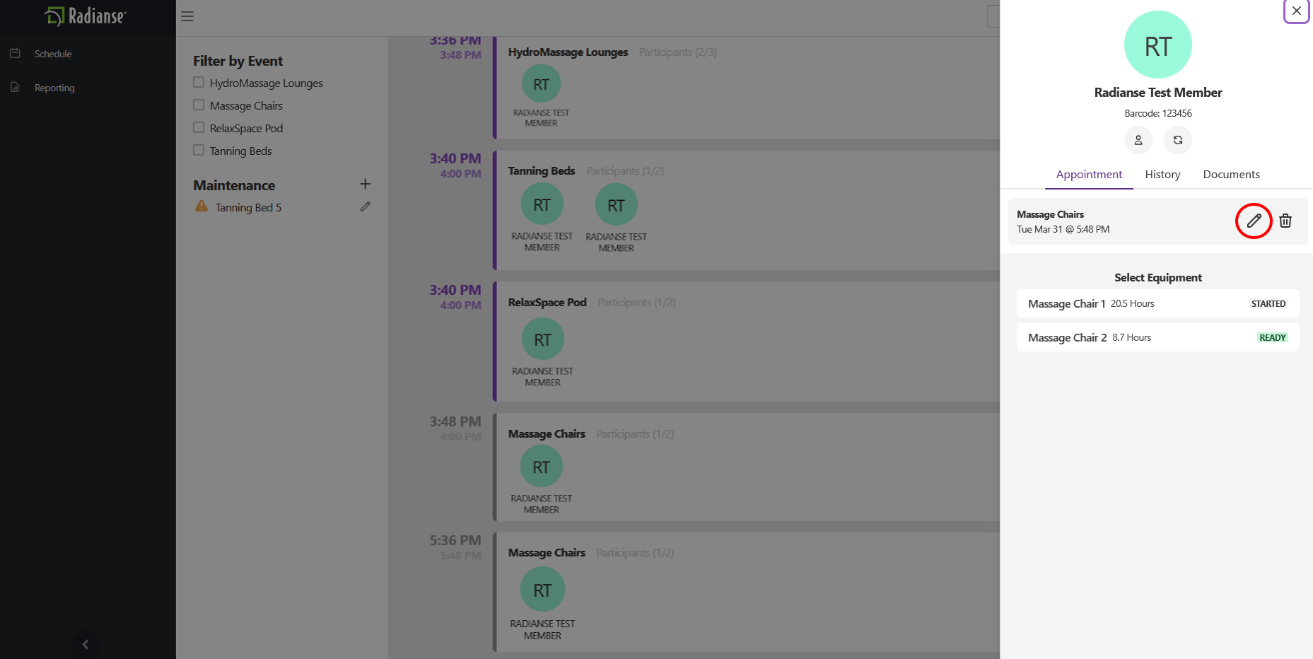
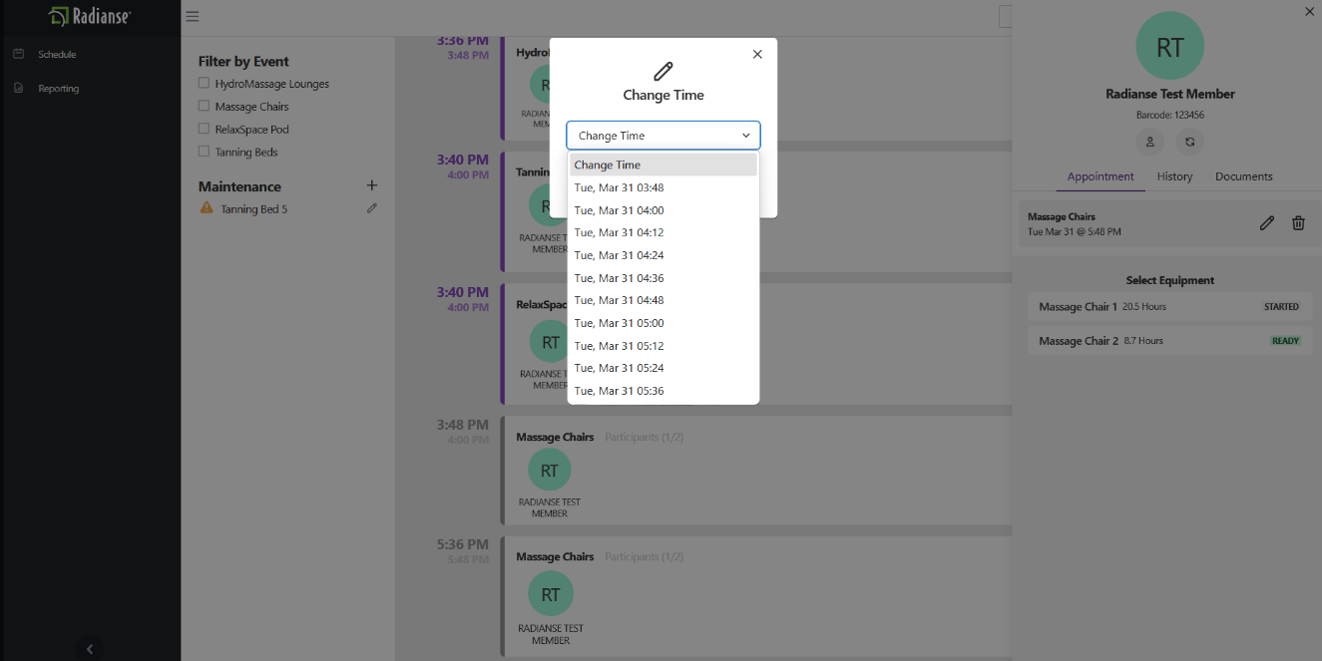
Rescheduling a Reservation
- Click the member's profile photo on the Schedule screen to open their detail panel on the right.
- Click the Pencil (Edit) icon next to the reservation you want to change.
- A Change Time dialog will appear. Select the new time from the dropdown, then click Submit. The schedule will update immediately.
5. Delete a Schedule
Staff can cancel any upcoming reservation directly from the Schedule screen.
Canceling a Reservation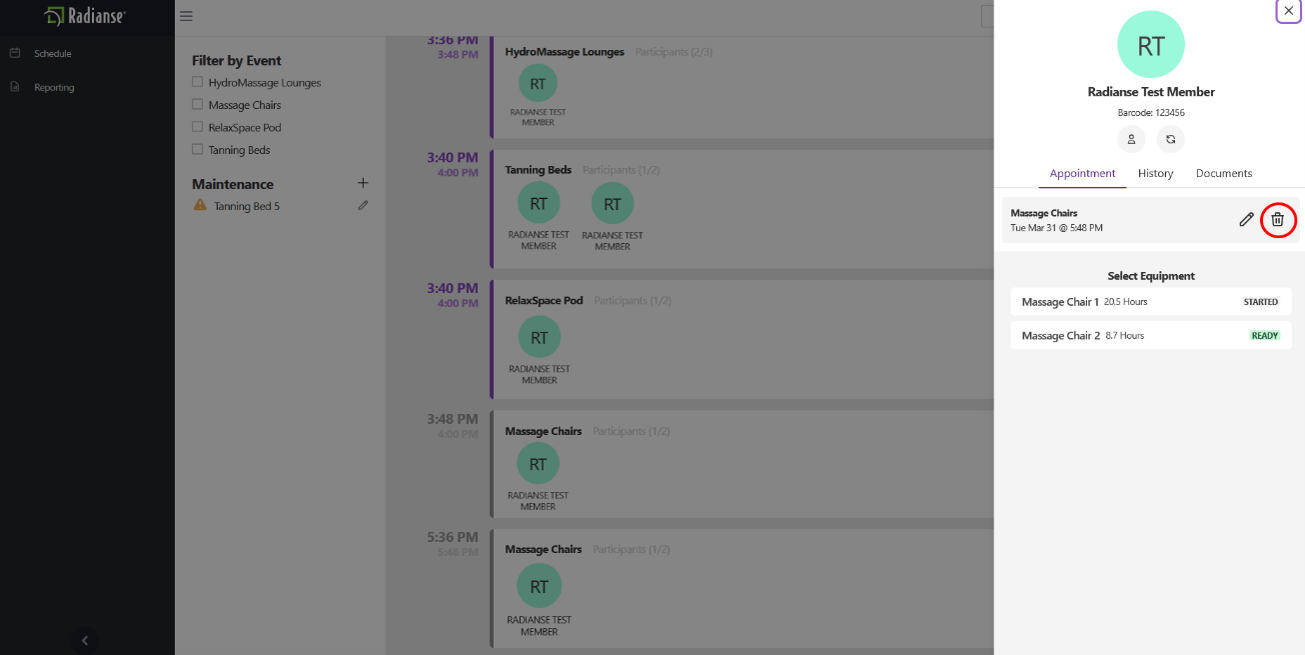
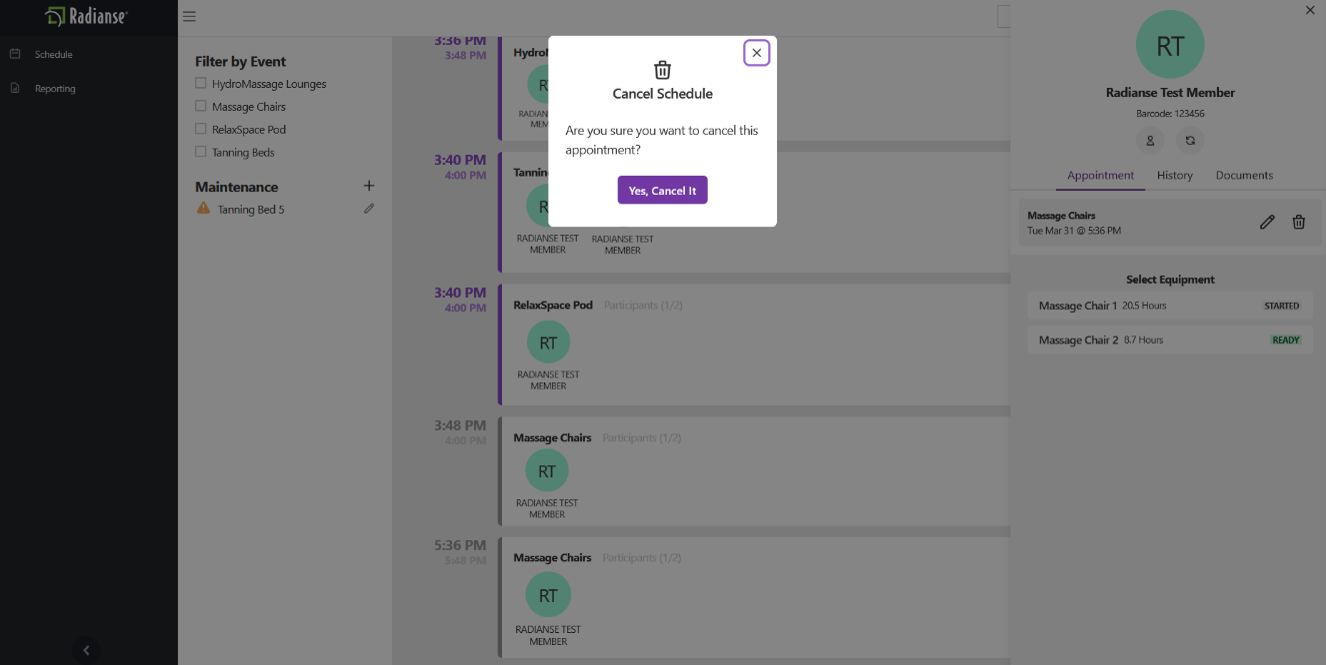
A confirmation notification will appear at the bottom of the screen once the reservation has been successfully removed.
Note: Past schedules are automatically removed from the Schedule screen after a configurable period of time. This retention window can be adjusted to meet your club's needs by contacting Radianse support.
Canceling a Reservation
- Click the member's profile photo to open their detail panel. The panel will display all current reservations for that member. Click the Trash Bin icon next to the reservation you want to remove.
- A confirmation prompt will appear asking if you are sure. Click Yes, cancel it to confirm. If you selected the wrong reservation, click the X button to close the prompt without making any changes.
A confirmation notification will appear at the bottom of the screen once the reservation has been successfully removed.
Note: Past schedules are automatically removed from the Schedule screen after a configurable period of time. This retention window can be adjusted to meet your club's needs by contacting Radianse support.
6. Amenity Maintenance Mode
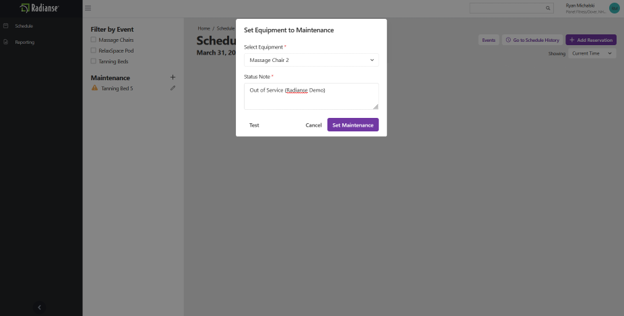
When a piece of equipment needs to be taken offline for repairs, cleaning, or any other reason, it can be placed into Maintenance Mode. This removes it from the scheduling system so members cannot book it until it is marked active again.
Placing Equipment in Maintenance Mode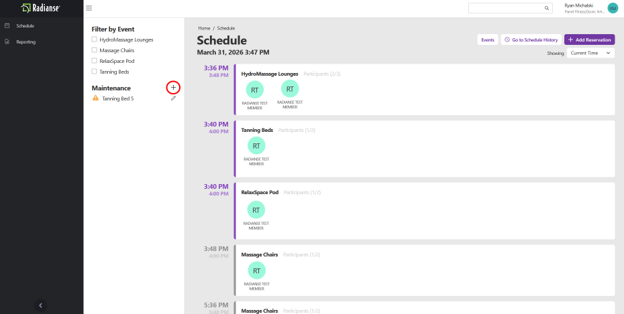
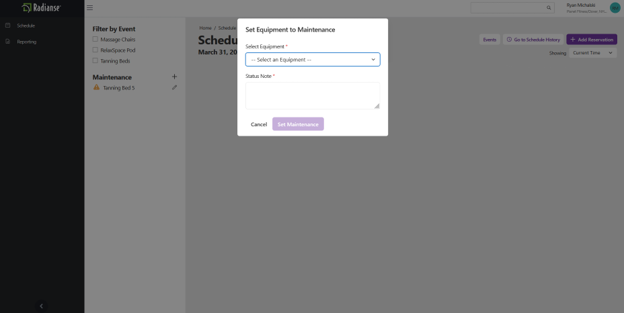
Returning Equipment to Active Status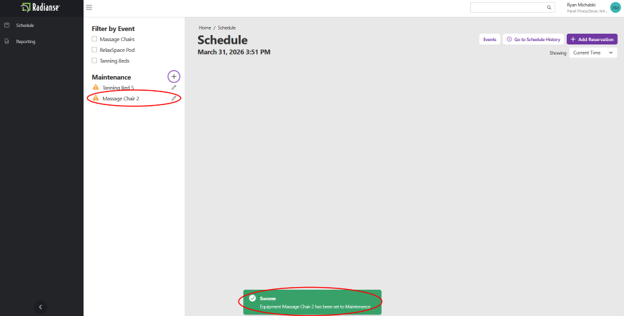
Placing Equipment in Maintenance Mode
- From the Schedule screen, click the + symbol next to the Maintenance section in the left panel.
- In the Set Equipment to Maintenance dialog, select the piece of equipment from the Select Equipment dropdown.
- Enter a brief reason in the Status Notes field (e.g., "Bulb replacement"), then click Set Maintenance.
- The equipment will now appear under the Maintenance section in the left panel of the Schedule screen, and will no longer be available for new bookings.
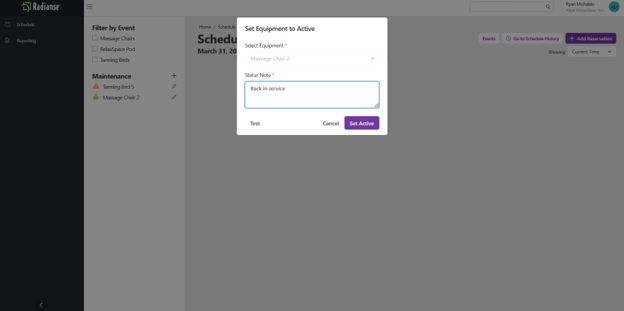
Returning Equipment to Active Status
- In the Maintenance section, click the Pencil (Edit) icon next to the equipment you want to reactivate.
- Enter a note in the Status Notes field describing why the equipment is being returned to service, then click Set Active. The equipment will be immediately available for new bookings.